Rawmarching Live Demo
by lucas a.
What's this?
This is a live demo of a tiny bare-metal program that is capable of rendering a raymarching-based scene. The 'screen' you see below is an actual computer! (well, it emulates one at least). Since the emulator is web-based, execution is very slow. Expect to wait a couple of minutes to get the full image. You can read the rest of the page and then come back here to check on the progress. If you're extra impatient, there are instructions on compiling everything yourself and running the code locally (which often results in faster execution) at the github repo.
How does it work?
1. Some Background Information
What makes this raymarching example differ from others is the fact that it runs as a standalone, self-contained system (and, (un)fortunately, runs on the CPU). Know Windows 10? MacOS? GNU/Linux? We're not using any of that here. Every function that's ever called was explicitly defined at some point - no such thing as a standard library. Even the square root function had to be re-implemented (I used a binary search algorithm). In order to better understand what's needed to go from nothingness to pixels on a screen, first we must look at how a typical desktop computer processor is setup.
2. Real Mode
2.1 The computer boots up in what is known as real mode, an execution state where the processor can't even address 1MB of memory and can only use 16-bit registers (variable-holders of sorts). In order to use the CPU to its full potential, most modern systems enter protected mode, which allows for the use of 32 or even 64-bit registers, as well as at least 4GB of RAM. In order for that to happen, though, the programmer must time-travel through well over 30 years of backwards compatibility, delving into the bizarre idiosyncrasies of the x86 architecture.
2.2 Awkwardly enumerated as '2', the first step is to create a bootloader that, through the use of BIOS interrupts, sets up the environment and loads up the actual raymarching program (named kernel.c - alluding to the fact that this is a process more common to operating systems than standalone executables). Since computers usually only load the first 512 bytes of a bootable disk, it is desirable to split the bootloader into two stages, to make sure everything fits. stage1.s in the boot/ source directory does just that, with the help of INT 13H - a rather scary-sounding BIOS subroutine (low-level function) that deals with disks.
2.3 stage2.s is then responsible for some rather weird things. For compatibility reasons, the 21st memory address bit is disabled by default, meaning that you can only access 1MB of memory, instead of 16MB. The first step, therefore, is to enable the A20 Line. If you're wondering how one can access so much memory with just 16 bits, the aforementioned link explains that the architecture uses a memory segmentation system. Now that the A20 Line is up and running, we can use INT 13H again to load the kernel (main, core program) to a sensible memory location.
2.4 Lastly, the Global Descriptor Table (GDT) is loaded by the CPU, specifying how the memory should be layout in 32-bit mode. Following that, all that remains is to signal that we're entering protected mode by setting the PE bit of the Control Register 0 and to execute a far (absolute) jump to the code segment defined by the GDT, where the kernel was previously loaded. Phew!
3. Protected Mode
3.1 All of the hassle of the previous section did come with some fairly significant benefits, however. Not only is the kernel code now able to fully utilise the processor, but we're also able to write code in an actual programming language, namely C. I didn't mention it, but if you had the curiosity to peek at the source code, you probably noticed that all the code so far was written in assembly language (hinted at by the .s file extensions).
3.2 Compiling C code is a bit trickier than it seems, though. Most compilers are used to the cozyness of a fully-fledged operating system, where there is access to standard libraries and many other abstractions. I won't go into too many details, but it is safe to bet that you'll get very nasty bugs if you don't remind yourself that you're in a barebones environment. For that reason, a cross compiler is usually built. Assuming everything is working as it should, now we're tasked with interfacing with the VGA adapter and calculating some pixel values.
4. Graphics Programming
4.1 Talking to the VGA-compatible card is thankfully a bit more straightforward - if you're not planning on switching video modes, that is. Firstly a color palette is set by writing to specific ports on the computer (I chose grayscale for simplicity). I didn't mention it, but we'll be using 320x200 256 color video - a far cry from full HD or even 4K, but more than good enough for a simple demonstration. Then, we can begin setting pixels by writing to memory addresses that the adapter is using. In this video mode, the pixel buffer starts at location 0xA0000, so all that's left to be done is to calculate the pixel values with some algorithm and write them there. The algorithm, in case it wasn't totally apparent, is raymarching.
4.2 Fully explaining raymarching would take a document of its own, so I'll just briefly mention what it does, given that the main goal of the project was to illustrate how to interface with the hardware at the low level. In sum, raymarching is about casting view rays from a point in 3D space and checking for intersections with predefined geometry. In raymarching, the geometry is not determined by discrete points, but rather by signed distance functions. This means that spheres are mathematically perfect and many operations can easily be performed on the objects. With proper distance functions, simple lighting can be calculated by determining the angle between the surface of the object and a punctiform light source.
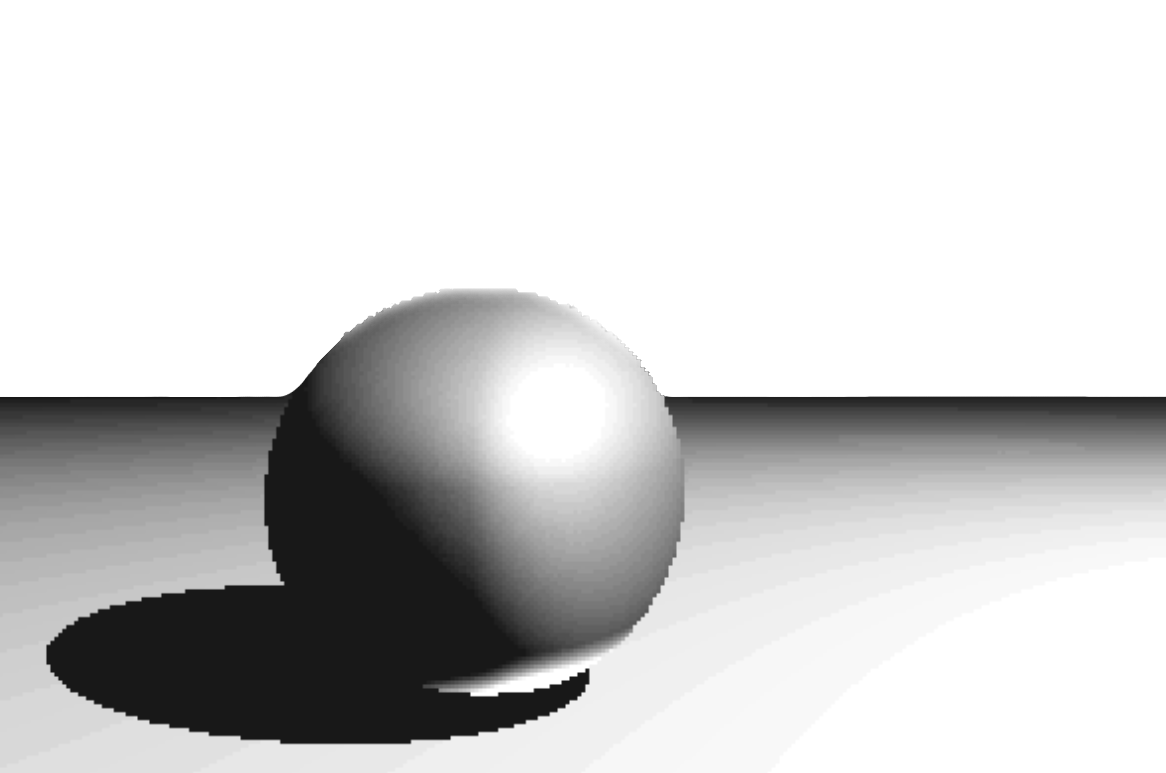
4.3
Now that rays are cast for each pixel in the direction of the
scene and the lighting is then calculated, the intensity of the
light value can be directly poked into the VGA memory location
previously discussed. Let it run for a while and we get this:
A sincere thank you
Thanks for reading! :)
I hope you've enjoyed this small dive into the nitty-gritty!
And thanks to all of the following for amazing resources:
- OSDev Wiki - for just about anything you might need regarding OS development.
- os-dev.pdf by Nick Blundell - a great introduction to low-level development for dummies.
- Ray Marching for Dummies! - an approachable introductory video to raymarching by Martijn Steinrucken.
- Wikipedia articles on interrupts - a great reference for using BIOS routines in real mode.
- C sqrt() snippet - a simple binary search implementation of the square root.
- A20 Line test code - public domain assembly code for checking the A20 Line status in real mode.
- Inline Assembly/Examples - for common C inline assembly functions used for I/O access.
- OpenGL Reference Pages - for insight into vector math functions.
- Setting teh (sic) Color Palette - information about the VGA color palette.
- Vector magnitude & normalization - concise explanations of what it means to normalize a vector.
- GNU make manual - manual for using GNU Make for executable generation from source code.
- Using LD, the GNU linker - resource that explains common options for linking executables with ld.
- GCC Cross-Compiler - information about building a cross-compiler for OS development.
- v86 - a virtual machine library for the web.